How to Clean a Grill
Most grills are never truly clean. Find out what a clean grill actually looks like inside — component by component — and what it takes to get there.
What "Clean" Actually Means for a Gas Grill
Most homeowners think their grill is reasonably clean because the cooking grates do not look terrible and they brushed it off after the last cookout. The reality, in most cases, is different. The grates are one component out of a dozen inside a gas grill — and they are one of the easier ones to keep presentable. The components that matter most for safety, performance, and the actual flavor of your food are the ones you cannot see without disassembling the grill.
This guide approaches grill cleaning differently. Instead of just covering the steps, it breaks down what each component looks like when it is genuinely dirty, what it looks like when it is truly clean, and what the practical difference between those two states means for how your grill cooks, how long it lasts, and how safe it is to use.
The Part Most People Skip
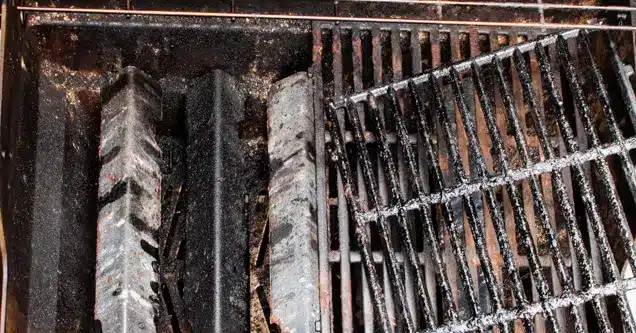
A wire-brushed grate on a grill with a heavily soiled firebox, grease-saturated heat plates, and blocked burner ports is not a clean grill — it is a presentable surface on top of a maintenance problem. The grill looks acceptable from the outside while its internal components are doing none of their jobs properly. Understanding what is underneath the grates is the starting point for understanding what cleaning a grill actually requires.
Every Component That Needs Cleaning — and Why
A gas grill has more cleanable components than most homeowners realize. Here is what each one does, what it looks like when neglected, and what proper cleaning achieves.
Cooking Grates
The most visible component and the one most homeowners focus on. Food residue and grease bake onto grate rods with each use — contributing to sticking, off-flavors, and uneven heat contact. A clean grate has clear rod surfaces with no carbonized buildup between them. See our grill grates guide for material-specific cleaning and when replacement is the right call.
Heat Plates & Briquette Trays
These sit directly above the burners and distribute heat across the cooking surface. They are typically the most heavily soiled components in any grill — coated in layers of carbonized grease that absorb heat, block airflow, and directly reduce cooking temperature. A clean heat plate is a component that can actually do its job. See our briquette trays guide.
Burners
The engine of the grill. Each burner has ports along its length that must be open and clear for even gas distribution. Blocked ports mean patchy flame, hot and cold zones, and reduced overall heat. Clean burners have clear ports, intact structure, and consistent flame across their full length. See our BBQ burner guide.
Firebox Interior
The cooking chamber walls, lid interior, and floor accumulate carbonized grease with every cookout. This buildup holds moisture, promotes mold growth during non-use, and contributes to off-flavors during cooking. A clean firebox has walls and lid interior that are free of carbonized buildup and debris.
Drip Tray
The grease collection tray below the firebox is the single most important component for fire safety in any gas grill. An overflowing drip tray is a direct fire hazard during cooking. A clean drip tray is empty, or close to it — not a container of months of accumulated liquid grease sitting inches below an active flame.
Burner Tubes & Ignition Area
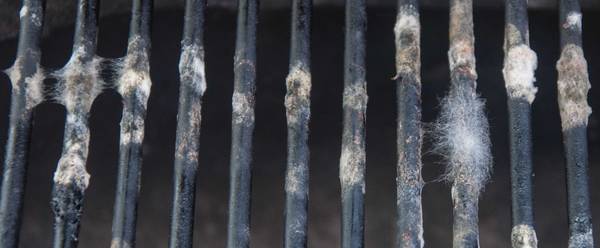
The interior of burner tubes and the area around the ignition electrode need clearing of spider webs and debris during every thorough clean. A web inside a burner tube blocks gas flow — not just at the ports but through the entire tube. This is the most common cause of ignition failure on grills that sit unused for a few weeks. See our ignition guide.
Dirty vs. Clean: What the Difference Actually Looks Like
The gap between a neglected grill and a professionally cleaned one is more dramatic than most homeowners expect. Here is what that difference looks like component by component.
Cooking Grates
Dirty
- Black carbonized buildup on all rod surfaces
- Grease deposits between rods that smoke during cooking
- Food sticks consistently regardless of oil application
- Potential rust underneath carbon layer on older grates
Clean
- Clear rod surfaces with visible metal or intact coating
- No carbonized residue between rods
- Food releases cleanly with normal oiling before cooking
- Grate condition accurately assessable — no hidden rust
Heat Plates
Dirty
- Multiple layers of hardened, carbonized grease
- Surface absorbs heat rather than distributing it
- Can hold enough residue to ignite and cause flare-ups
- Often warped or beginning to rust beneath the buildup
Clean
- Metal surface visible — either bare steel or coated
- Distributes heat evenly above burners as designed
- Condition accurately assessable for warping or rust-through
- No accumulated grease available to ignite during cooking
Firebox Interior
Dirty
- Thick carbonized grease on walls and lid interior
- Loose carbon flakes that fall onto food during cooking
- Moisture trapped in buildup promoting mold during non-use
- Debris accumulation on firebox floor — a direct fire hazard
Clean
- Walls and lid interior free of heavy carbonized deposits
- No loose debris on the firebox floor
- No conditions that promote mold growth during storage
- Heat circulates freely without absorption from buildup
How Often Does Each Part Need Cleaning?
Not every component needs attention after every cookout. Here is a realistic cleaning frequency for each part of the grill — and what happens when those intervals are consistently ignored.
| Component | Recommended Frequency | What Happens If Ignored |
|---|---|---|
| Cooking Grates | Brush after every cookout; deep clean every 3–6 months | Persistent sticking, off-flavors, hidden rust beneath carbon |
| Drip Tray | Empty every 3–5 cookouts | Overflow during cooking — direct grease fire hazard |
| Heat Plates | Deep clean every 3–6 months; inspect annually | Heat absorption, flare-ups, missed warping and rust-through |
| Burner Ports | Inspect and clear every 3–6 months | Uneven heat, hot and cold zones, reduced max temperature |
| Burner Tubes | Check for spider webs before first use after non-use | Ignition failure, dangerous gas accumulation before lighting |
| Firebox Interior | Deep clean every 3–6 months | Carbon flakes in food, mold growth, trapped moisture |
| Exterior | Wipe down monthly or as needed | Cosmetic degradation, grease migration into joints and seams |
What You Can Clean Yourself — and What to Use
Regular DIY maintenance between professional services extends grill life significantly and keeps performance consistent. Here is what is practical to handle at home and what each task actually requires.
After Every Cookout
- Brush grates while still warm — residue releases easily when hot and hardens when cold. A brass bristle brush is safe on all grate types including porcelain-coated
- Check the drip tray — if it is more than half full, empty it before the next use
- Leave the lid ajar briefly before covering — trapped moisture is the primary cause of mold growth in unused grills
Every 3–6 Months
- Remove and soak grates in warm soapy water, scrub, rinse, and dry thoroughly
- Remove and scrape heat plates — check for warping and rust-through while you have them out
- Clear burner ports — a toothpick or small wire run along each port row clears most blockages
- Scrape the firebox — plastic scraper on the walls and lid interior, working top-down
- Check burner tubes for spider webs by shining a light down each tube from the open end
The One Tool to Avoid
Steel wire brushes on porcelain-coated grates chip the coating and leave loose bristles on the cooking surface — bristles that can end up embedded in food. Use brass bristle brushes on coated grates. Steel wire brushes are only appropriate on bare cast iron and stainless steel grates. If your brush is shedding bristles, replace it immediately regardless of grate type.
What a Professional Clean Does That DIY Cannot
DIY cleaning maintains a well-kept grill. Professional cleaning restores one that has built up a maintenance backlog — and it reaches components and levels of buildup that are not practical to address without the right equipment and experience.
Full Disassembly
A professional clean involves removing every internal component — grates, heat plates, burners, drip system — so each one can be cleaned individually and inspected in isolation. Cleaning a grill without disassembly leaves the areas between and beneath components untouched, which is where the most significant buildup accumulates.
Honest Component Assessment
With every component out and clean, its actual condition is assessable in a way it is not when coated in grease. Warped heat plates, cracked burners, degraded grates, and failing ignition components are all identifiable during a professional clean in ways that are easy to miss during a surface cleaning. We tell you what we found before we leave — and what, if anything, warrants attention before the next cookout.
Hardened Grease Removal
Several years of accumulated, hardened carbonized grease inside a firebox is not addressable with dish soap and a sponge. Professional-grade non-toxic degreasers and the right tools remove buildup that DIY cleaning simply cannot shift — restoring firebox interior surfaces to a state that actually reduces flare-up risk and stops carbon from contaminating food. We use eco-friendly cleaning products throughout — safe on food-contact surfaces and appropriate for covered outdoor patio environments.
Burner and Ignition Inspection
Every burner is inspected for port blockage, physical deterioration, and correct seating. The ignition system is tested after reassembly. If anything is found that needs attention — a burner approaching end of life, an ignition component that is failing, a valve that does not close completely — it is flagged before we leave, not discovered during your next cookout.
Frequently Asked Questions
How long does it take to properly clean a gas grill?
A thorough DIY deep clean of a standard freestanding grill takes 1.5 to 2 hours if you have the right tools and go component by component. A quick post-cookout brush takes 5 minutes. A professional clean on a standard freestanding unit typically takes around an hour on-site — professional equipment and experience compress the time significantly. Built-in outdoor kitchen configurations take longer in both cases.
Can I use oven cleaner on my grill?
Not inside the cooking area. Oven cleaners contain lye and other harsh chemical compounds that leave residue on food-contact surfaces and produce fumes that linger in enclosed patio spaces. They can also damage porcelain and enamel coatings. Non-toxic, food-safe degreasers clean grill interiors effectively without these risks — and are the appropriate choice for any surface that will contact food. See our eco-friendly cleaning approach.
How do I know if my grill needs a professional clean or just a DIY maintenance session?
If your grill is maintained consistently and the last professional clean was within the past year, a thorough DIY session every few months is appropriate between visits. If the grill has not been professionally cleaned in over a year, has significant grease buildup that surface cleaning is not addressing, or is producing noticeably lower heat, uneven cooking, or more flare-ups than usual — those are signals that a professional clean is the right next step. See our grill cleaning cost guide for what professional service involves and what it costs.
My grill still smells after cleaning — did I miss something?
A lingering smoke smell after cleaning is usually residual grease in areas that were not fully addressed — particularly the firebox walls, the inside of the lid, and the drip tray area. Run the grill at high heat with the lid closed for 15 minutes after cleaning to burn off remaining residue. If the smell persists through multiple cookouts, significant grease remains somewhere in the system — commonly behind or beneath the heat plates in areas that are not accessible without full disassembly.
What is the best way to clean a grill after winter storage?
Before the first cookout after an extended period of non-use, do the following: inspect burner tubes for spider webs, check for mold inside the firebox and on grates, look for rodent evidence including droppings or nesting material, test ignition on each burner, and confirm the drip tray is empty. If the grill has sat covered through a winter season without use, a professional inspection and clean before the first spring cookout is a practical investment.
Related Resources
- Professional BBQ Grill Cleaning Service
- How Much Does Grill Cleaning Cost?
- What Is the Best Way to Clean a Grill?
- How to Clean a BBQ Grill — Step by Step Guide
- Eco-Friendly Grill Cleaning
- BBQ Grill Burners — Cleaning, Repair & Replacement
- Grill Grates — Materials, Maintenance & Replacement
- Briquettes & Briquette Trays
- BBQ Grill Inspections
- Mold in Your Grill — Is It Dangerous?
- Rodents in Your Grill — What to Do
- Why Is My Grill Not Heating Up?
Ready for a Grill That Is Actually Clean?
SoCal Grill Masters provides professional mobile BBQ grill cleaning throughout Orange County and Southern California. Full disassembly, every internal component, honest inspection — and a grill that performs the way it should when we leave.