How to Clean a BBQ Grill: The Complete Guide
What to clean, how to clean it, what most guides skip — and when DIY maintenance is not enough to restore a grill that has been neglected too long.

Why Grill Cleaning Matters More Than Most People Think
Cleaning your grill is not just about appearances. A grill that is regularly and properly cleaned cooks food more evenly, reaches higher temperatures, produces fewer dangerous flare-ups, lasts significantly longer, and is genuinely safer to use. A grill that only gets a surface wire-brush between cookouts is doing none of those things particularly well — regardless of how it looks from the outside.
Most cleaning guides cover the steps. This one also covers the why behind each step, the mistakes that are more common than they should be, and the honest line between what you can handle yourself and when a grill needs more than DIY maintenance can deliver. The guides ranking on the first page of Google cover the basics — but they are written by people who clean kitchen appliances, not by people who have opened thousands of grills across Southern California and know exactly what gets missed.
How Often Should You Clean Your Grill?
After every cookout: Brush grates while still warm and empty the drip tray. Takes 5 minutes and prevents the buildup that makes deep cleaning much harder.
Every 3–6 months: A more thorough cleaning of grates, heat plates, and firebox interior. Addressable at home with the right tools and effort.
Once or twice a year: A full professional deep clean — full disassembly, cleaning of every internal component, inspection of burners, heat plates, ignition, and valves. This is what the steps below are working toward.
What You Need Before You Start
Having the right tools makes the process significantly faster and avoids causing damage in the process of cleaning.
Cleaning Tools
- Brass bristle brush (safe on all grate types)
- Stainless steel brush (for cast iron only)
- Plastic scraper or putty knife
- Microfiber cloths and paper towels
- Bucket and warm water
- Disposable gloves
Cleaning Products
- Non-toxic, food-safe degreaser
- Dish soap (for grates and removable parts)
- Baking soda paste for stubborn spots
- Stainless steel cleaner for exterior
- Cooking oil for re-seasoning cast iron grates
A Word on Products
Avoid oven cleaners and harsh chemical degreasers on the cooking interior — these leave residue on food-contact surfaces and produce fumes that linger in enclosed patio spaces. Non-toxic, biodegradable degreasers clean just as effectively and are the appropriate choice for a food preparation surface. See our eco-friendly cleaning guide.
How to Deep Clean a Gas Grill: Step by Step
This covers a thorough DIY deep clean — not just a post-cookout brush. Set aside 1.5 to 2 hours for a standard freestanding grill. Built-in outdoor kitchen configurations will take longer.
Turn Off and Disconnect the Gas
Turn all burner knobs to off and close the propane tank valve completely before starting. For natural gas grills, close the supply shutoff valve. Never clean a grill with gas flowing — even a cold grill should be fully disconnected before disassembly. Wait until the grill is completely cool before beginning.
Remove and Soak the Cooking Grates
Remove cooking grates and place them in warm soapy water to soak while you work on the rest of the grill. For porcelain-coated grates, use dish soap and warm water only — no harsh chemical soaks. For cast iron, a warm water soak is fine but dry thoroughly and re-oil immediately after to prevent rust. See our grill grates guide for material-specific cleaning advice — the wrong approach chips porcelain coating and leaves metal exposed.
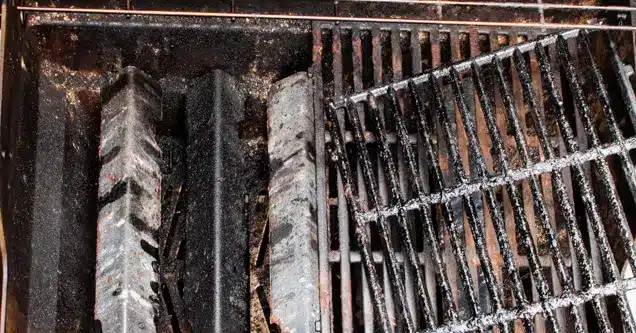
Remove and Clean Heat Plates and Briquette Trays
Lift out heat plates and briquette trays — these sit above the burners and below the grates. They are often the most heavily soiled components in the grill and are responsible for more heat performance loss than any other single component when neglected. Scrape off heavy carbonized buildup, wash with warm soapy water, and inspect each piece for warping, cracking, or rust-through. Warped or cracked heat plates should be replaced rather than reinstalled. See our briquette trays and heat plates guide.
Inspect and Clean the Burners
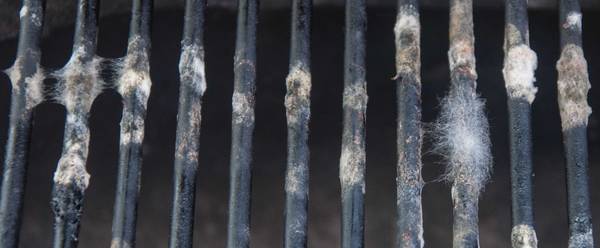
With heat plates removed, the burners are now accessible. Inspect each burner for blocked ports — small holes along the burner tube that should be open and clear. Use a small wire or toothpick to clear individual blocked ports, working along the length of each burner. Check the burner tubes themselves for spider webs by shining a light down the tube from the end. Any web inside a burner tube must be cleared before relighting — attempting to light a grill with a blocked burner tube allows gas to accumulate before ignition. Inspect each burner for cracking, rust-through, or significant physical deterioration. See our full BBQ burner guide for when cleaning is sufficient and when replacement is needed.

Clean the Firebox Interior
The firebox — the main cooking chamber walls, floor, and underside of the lid — accumulates carbonized grease over time. Use a plastic scraper to loosen buildup from the walls and lid interior, working carefully to avoid damaging the enamel or porcelain coating if present. Apply a non-toxic degreaser, let it sit for a few minutes, then wipe clean with a microfiber cloth. Work from top to bottom so loosened debris falls to the bottom where it can be swept out. The firebox floor should be cleared of all loose debris before reassembly — this debris is a flare-up hazard during cooking.
Empty and Clean the Drip Tray
The drip tray collects grease that drips down from the firebox during cooking. On a heavily used grill, this tray can overflow — and overflowing grease that reaches the burner area is a direct fire hazard. Remove the tray, scrape out the accumulated grease, wash with warm soapy water, dry thoroughly, and reinstall. Line it with aluminum foil for easier future cleaning if your grill configuration allows it. Emptying the drip tray regularly between deep cleans is the single most effective maintenance habit for preventing dangerous grease flare-ups.
Scrub and Rinse the Grates
After soaking, scrub grates thoroughly. Use a brass bristle brush on porcelain-coated grates — never a steel wire brush, which chips the coating and can leave wire bristles on the cooking surface. Steel wire brushes are safe on bare cast iron and stainless steel grates. Rinse thoroughly and dry completely before reinstalling. For cast iron grates, apply a thin coat of cooking oil immediately after drying to maintain the seasoning layer and prevent rust.
Clean the Exterior
Wipe down the exterior of the grill with warm soapy water and a soft cloth or sponge. For stainless steel exteriors, use a dedicated stainless steel cleaner applied in the direction of the grain to avoid scratching. Avoid abrasive pads on stainless surfaces. Clean the control knobs, side shelves, and handle areas — these are touched every time the grill is used and accumulate grime quickly.
Reassemble and Test
Reinstall heat plates, grates, and all removed components. Reconnect the gas supply. Open the tank valve slowly — opening it quickly can trigger the regulator's safety bypass mode and result in low heat output. Light each burner and confirm a consistent blue flame across the full length of each burner, with no gaps or dead zones. Run the grill at high heat with the lid closed for 10–15 minutes before the next cook to burn off any remaining cleaning residue. If any burner produces uneven, weak, or absent flame, see our troubleshooting guide for low heat.

What Most Cleaning Guides Do Not Tell You
Do Not Use a Steel Wire Brush on Porcelain-Coated Grates
This bears repeating because it is one of the most common grill cleaning mistakes. Steel wire brushes chip porcelain coating and leave loose bristles behind on the cooking surface — bristles that can end up embedded in food. There are documented cases of wire brush bristles causing injury when consumed. Use brass bristle brushes on coated grates, or a crumpled piece of aluminum foil as an alternative scraper. Replace any grill brush whose bristles are loose or shedding.
Burning Off Grease Is Not a Substitute for Cleaning
Turning the grill to high to burn off residue after cooking removes some surface debris from grates — but it does not address grease accumulation inside the firebox, on heat plates, or in the drip system. It also carbonizes existing grease deposits, making them progressively harder to remove over time. Burning is a maintenance habit for between-cookout upkeep. It is not a substitute for actual cleaning.
The Drip Tray Is Not Optional
Most homeowners clean the cooking surface, forget the drip tray, and wonder why their grill keeps flaring up. The drip tray is where the majority of grease accumulates — it is the direct fire hazard. An overflowing drip tray during cooking is one of the most common causes of grill fires. Empty it every 3–5 cookouts regardless of how clean the rest of the grill looks.
Burner Port Blockage Is Invisible from the Outside
A grill can look perfectly clean from the outside while having burner ports that are 50% blocked by carbonized grease or spider webs. Blocked ports produce uneven heat, hot spots, and reduced overall temperature — problems that homeowners frequently attribute to gas supply issues or grill age. Inspect and clear burner ports during every thorough cleaning. See our BBQ burner guide for what to look for.
When DIY Cleaning Is Not Enough
There is a meaningful difference between maintaining a well-kept grill with regular DIY cleaning and restoring a grill that has built up years of deferred maintenance. The steps above are within reach of any homeowner who takes the time. But there is a point past which DIY cleaning does not restore full performance — and where attempting it without the right experience and tools risks damaging components rather than cleaning them.
Call a professional when:
- The grill has not been professionally serviced in more than a year
- Grease buildup inside the firebox is significant and hardened — several years of accumulation is genuinely difficult to remove safely without the right tools
- Burners, heat plates, or grates need assessment for replacement alongside cleaning
- The grill is a premium built-in where working around stone, tile, and cabinetry requires experience
- There is mold, rodent evidence, or other contamination requiring safe removal before cleaning — see our guides on mold in your grill and rodents in your grill
- You want a combined cleaning and inspection that assesses every component's condition honestly
A professional deep clean covers every internal component — not just the cooking surface — and includes an honest condition assessment of burners, heat plates, ignition, valves, and grates. Most homeowners are surprised by how much material is removed and how significant the performance improvement is. See our grill cleaning cost guide for what professional service involves and what it costs.
Keeping It Clean: Habits That Make a Real Difference
The gap between a grill that needs a quick professional clean once a year and one that requires serious restoration every couple of years comes down to a handful of simple habits maintained consistently.
After Every Cookout
- Brush grates while still warm — food residue comes off easily when hot and hardens when cold
- Empty the drip tray if it is more than half full
- Close the lid after the last burner is off and let residual heat burn off surface debris for 5 minutes
- Leave the lid slightly ajar for a few minutes before covering — trapped moisture promotes mold
Every Few Months
- Remove and wipe down heat plates and check for warping
- Visually inspect burner tubes for spider webs — particularly after periods of non-use
- Re-season cast iron grates with cooking oil if they show any surface rust
- Clean the exterior and check gas connections for any signs of wear
- Check ignition batteries if your system is battery-powered
Common Questions About Cleaning a BBQ Grill
Can I put grill grates in the dishwasher?
Stainless steel and porcelain-coated grates can technically go in the dishwasher — but the high heat and harsh detergents degrade porcelain coating faster and can cause stainless to discolor over time. Cast iron grates should never go in the dishwasher — the process strips the seasoning and causes immediate rust. Soaking in warm soapy water and hand scrubbing is more effective and less damaging for all grate types.
How do I clean a grill that has not been touched in years?
A grill that has been left uncleaned for an extended period — or one inherited from a previous property owner — is likely to have significant hardened grease buildup, possible mold growth, spider web blockage in burner tubes, and degraded components. A thorough DIY clean is possible but will take considerable time and effort, and you may find that some components need replacement rather than cleaning. For grills with a long maintenance backlog, a professional cleaning and inspection is often more practical than a DIY deep clean — and gives you an honest assessment of what the grill actually needs.
My grill still does not heat well after cleaning — what did I miss?
If a thorough cleaning has not restored heat performance, the issue is likely in a component rather than accumulated debris. Common post-cleaning heat problems include partially blocked burner ports that were not fully cleared, a regulator in bypass mode triggered during reconnection, or burner tubes that are physically deteriorating. See our guide on why your grill is not heating up for a systematic walkthrough of all the common causes.
Related Guides
- What Is the Best Way to Clean a Grill?
- Eco-Friendly Grill Cleaning — Our Safer Approach
- Professional BBQ Grill Cleaning Service
- How Much Does Grill Cleaning Cost?
- BBQ Grill Burners — Cleaning, Repair & Replacement
- Grill Grates — Materials, Maintenance & Replacement
- Briquettes & Briquette Trays — When to Replace Them
- BBQ Grill Inspections — What to Expect
- Mold in Your Grill — Is It Dangerous?
- Rodents in Your Grill — What to Do
- Why Is My Grill Not Heating Up? 15 Common Causes
- Is It Worth Repairing a Barbecue?
Want It Done Properly? We Come to You.
SoCal Grill Masters provides professional mobile BBQ grill cleaning throughout Orange County and Southern California. Full disassembly, every internal component, honest inspection, and a grill that performs like it should when we leave.